Goal
Today is the day that we learn to control Robby remotely.
Robby can already drive around remotely but sometimes we want to control directly, there are many ways we can do this.
1. Move Robby's instructions into a function
Right now Robby has just one set of instructions, drive forward and turn when there is an obstacle, the first thing we need to do is move those instructions into a separate function.
This way we can have a large number of different behaviours for Robby that we can call whenever we want.
First select and cut the large instruction block from the loop() and add it to a new function called Auto()
                       void loop() {
                         distR = sonarR.ping() / 58.2;
                         distL = sonarL.ping() / 58.2;

                       // CUT FROM THIS LINE
                         if (distL < 20){
                           Move(1, -1);
                         } else if (distR < 20){
                           Move(-1, 1);
                         } else {
                           Move(1, 1);
                         }
                        // TO THIS ONE

                         delay(10);
                       }


                       void Auto() {
                        // PASTE THE LINES HERE

                       }
Your code should now look like this.
                       void loop() {
                         distR = sonarR.ping() / 58.2;
                         distL = sonarL.ping() / 58.2;

                         delay(10);
                       }

                       void Auto() {
                         if (distL < 20){
                           Move(1, -1);
                         } else if (distR < 20){
                           Move(-1, 1);
                         } else {
                           Move(1, 1);
                         }
                       }
Right now Robby won't do anything if we turn him on because even though the instructions all exist in the Auto() function, we are never calling them. To make Robby work as before we just need to write Auto(); in our loop() where the instructions used to be.
We aren't going to do that right now though, we are going to learn how to set different modes for Robby.
2. Modes
Now that our set of instructions is in it's own function we can call it any time, we just need to write some code to tell Robby which set of instructions to call.
We will create an int variable called "mode" to keep track of what Robby should be doing at any given time. If mode equals 1, he should drive forward, 2 means go backward, maybe 5 means follow the instructions in Auto() etc.
So that we don't have to remember which number means which, we are also going to create some new definitions. These go at the very top of our code.
                       #define STOP 0
                       #define FWD 1
                       #define BACK 2
                       #define LEFT 3
                       #define RIGHT 4
                       #define AUTO 5

                       int mode = STOP;
Pay close attention to those #define commands, they are not variables, we don't put an '=' sign and they don't need a ';' at the end.
These simply tell the Arduino that whenever we write STOP we mean 0, when we write AUTO we mean 5 etc. When the code is sent to the Arduino every instance of STOP will be replaced with a 0, these are just to make our code easier to understand.
Now we just put a new IF block in our loop() that will tell Robby what to do based on what mode he is in.
                       if (mode == STOP){
                         Move(0, 0);
                       } else if (mode == FWD){
                         Move(1, 1);
                       } else if (mode == BACK){
                         Move(-1, -1);
                       } else if (mode == LEFT){
                         Move(-1, 1);
                       } else if (mode == RIGHT){
                         Move(1, -1);
                       } else if (mode == AUTO){
                         Auto();
                       } else {
                         Move(0, 0);
                       }
Changing the mode with a remote control.
To change the mode of Robby we are going to use an IR remote like the one from your TV or air conditioner.
When we push a button on the remote a little infrared light on the front flashes, there is a code in the flashes that Robby will need to decode and to do that we are going to need another library.
If the obstacle is on his left he should turn right, if it is on his right he should turn left.
Download the IRLib library here and put it in Arduinos library folder, don't forget to reset the Arduino software so it loads the new library.
Due to a conflict between the IRLib and the standard NewPing library you will also have to replace your old NewPing library with this modified version.
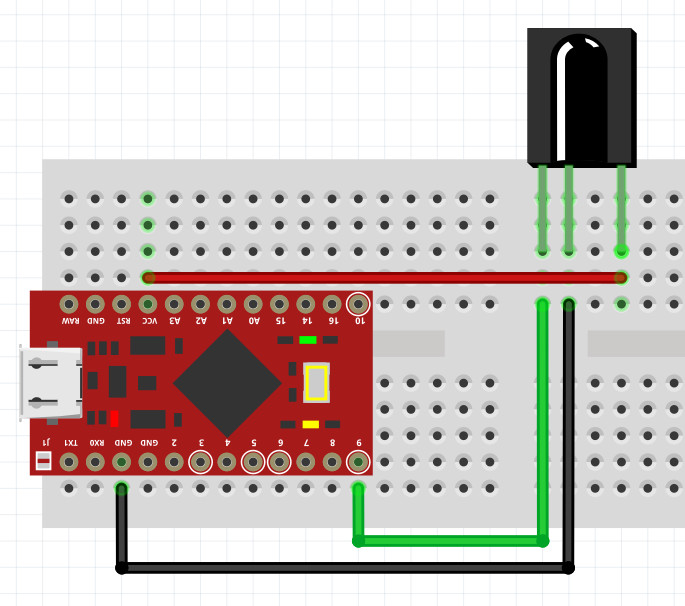
The wiring for the IR Receiver is pretty simple, with the round side facing you the left pin goes to an Arduino digital pin (9 today), the middle pin goes to the GND on the Arduino and the rightmost pin goes to vcc or +5v.
The code for the IR receiver is a little tricky, so read carefully.
First you need to include the library IRLib in you code so put this line at the very top of your code either before or after the NewPing include.
#include <IRLib.h>
We need to make 2 variables, one to remember our receiver and one to hold a new object, the IRDecode which will translate the IR code for us.
Put the following lines near the top of your code with the rest of the variables
                     IRrecv ir(9);
                     IRdecode irDecode;
Now in the setup() function include the following line to set up the initial state for the ir object.
ir.enableIRIn();
Finally we are going to make a function called CheckIR() to check the IR so put the following line at the start of the loop() function.
CheckIR();
Now we will make the CheckIR() function, read the comments in the code below to to make sure you understand what it is doing.
                     void CheckIR(){
                        if (ir.GetResults(&irDecode)){ // Checks if there has been any signal received by the IR
                           irDecode.decode(); // Decodes the signal
                           irDecode.DumpResults(); // Dumps all the results of the decoded signal, check the Serial Monitor
                           ir.resume(); // Resets the receiver so it's ready to receive future messages
                        }
                     }
This code checks if the IR receiver has received anything, if it has it translates and then dumps the results to the Serial Monitor, you should get something like this now when you point the remote at the receiver and press a button.
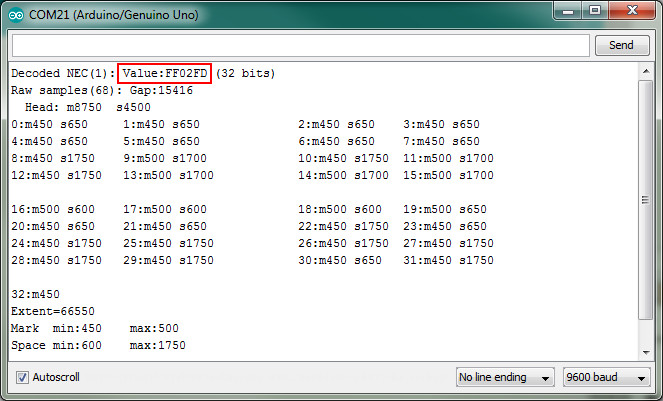
You can see there is a lot of information there but all we care about is the value in the red square, this is the code that is made by that particular button. Try pressing different buttons on the remote and you'll notice that the value is different each time. We need to work out the value for each of the buttons we want to use.
Press the "Power" button on the remote, the value should be something like "FFA25D", write the code below into your CheckIR() function.
                     void CheckIR(){
                        if (ir.GetResults(&irDecode)){
                           irDecode.decode();

                           if (irDecode.value == 0xFFA25D){
                              mode = STOP;
                              Serial.println("STOP");
                           } else if (irDecode.value == 0x000000){
                              mode = FWD;
                              Serial.println("FWD");
                           } else if (irDecode.value == 0x000000){
                              mode = BACK;
                              Serial.println("BACK");
                           } else if (irDecode.value == 0x000000){
                              mode = LEFT;
                              Serial.println("LEFT");
                           } else if (irDecode.value == 0x000000){
                              mode = RIGHT;
                              Serial.println("RIGHT");
                           } else if (irDecode.value == 0x000000){
                              mode = AUTO;
                              Serial.println("AUTO");
                           } else {
                              irDecode.DumpResults();
                           }

                           ir.resume();
                        }
                     }
Now when we press the power button the Arduino will change the mode to STOP (which is 0) and print the "STOP" message to serial so we can be sure it worked.
You'll have to go through the rest of the values and input them yourselves, press the button you want to be forward and then replace the 0x000000 with the results you get from the Serial Monitor. Make sure you keep the 0x at the start, that tells the Arduino what kind of number it is.
If you are super stuck you can find the complete code so far here.