Goal
Today we will complete the basic construction of our robot with battery, motors and sonar eyes working together.
We will then program an autoroaming AI into our robot so it will avoid hitting walls.
Robby
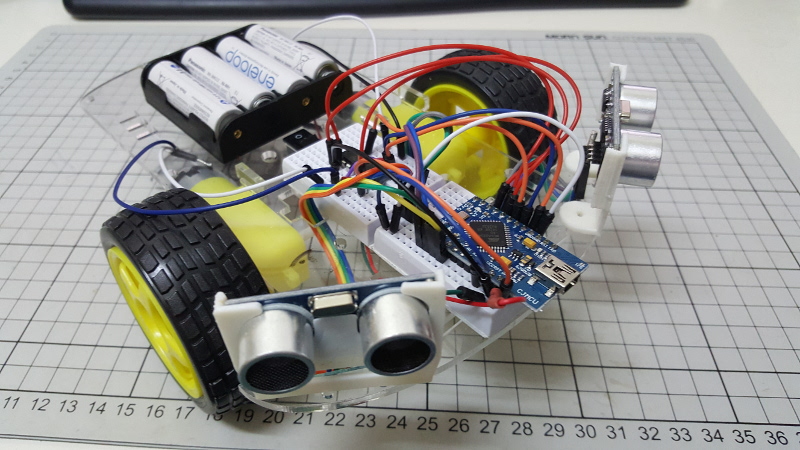
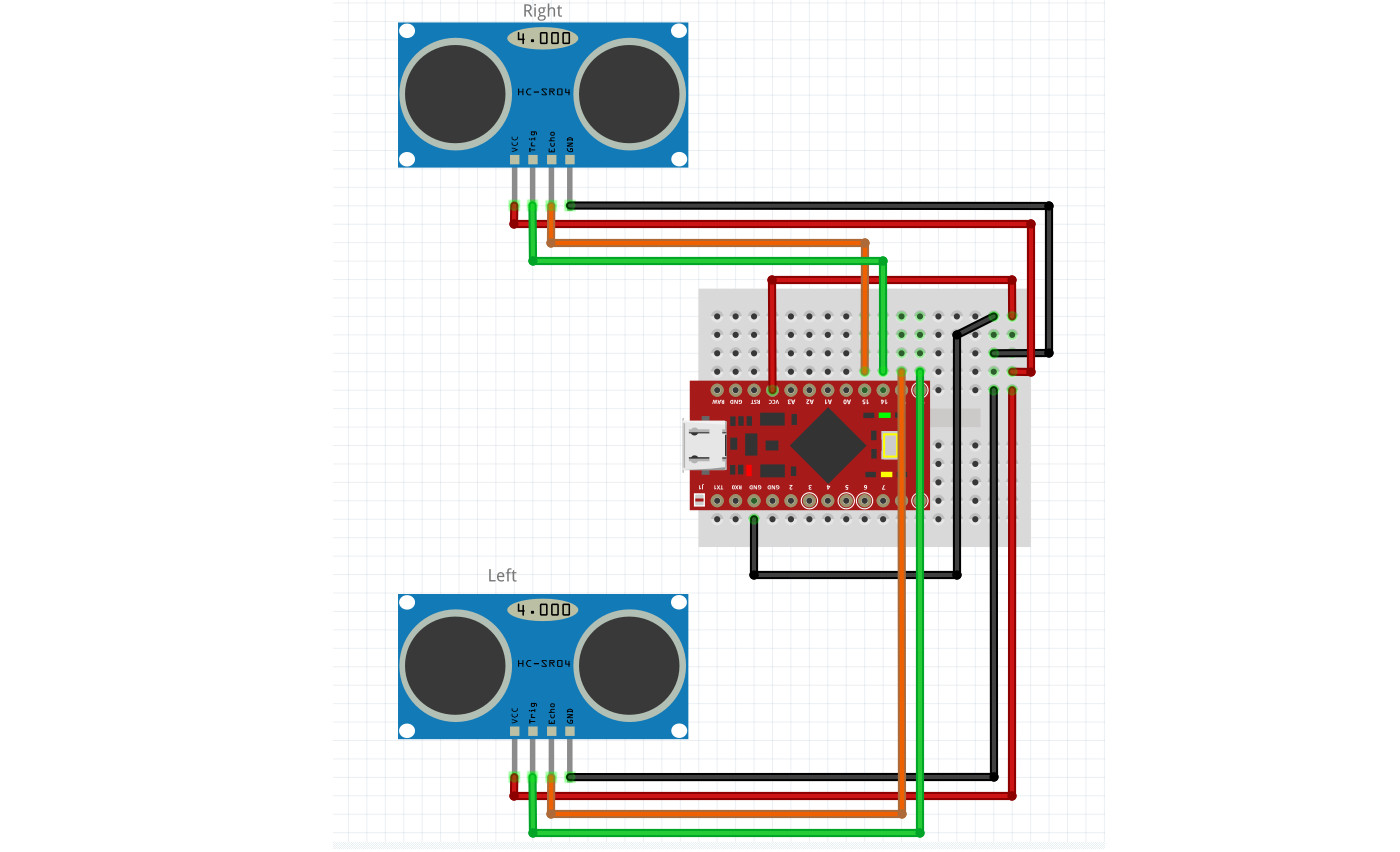
1. Check the sonar
First lets make sure everything is plugged in properly.
The code below will test the sonar units to make sure they are working properly. Check the results in the Serial Monitor.
                       #include <NewPing.h>

                       int trigL = 10;
                       int echoL = 16;
                       int trigR = 14;
                       int echoR = 15;

                       int distR = 200;
                       int distL = 200;

                       int maxDistance = 200;

                       NewPing sonarR(trigR, echoR, maxDistance);
                       NewPing sonarL(trigL, echoL, maxDistance);

                       void setup() {
                         Serial.begin(9600);
                       }

                       void loop() {
                         delay(50);
                         distR = sonarR.ping() / 58.2;
                         distL = sonarL.ping() / 58.2;

                         Serial.print("Dist: R:");
                         Serial.print(distR);
                         Serial.print("\tL:");
                         Serial.print(distL);
                         Serial.println("cm");
                       }
If there are any issues you can find the proper wiring diagram below.
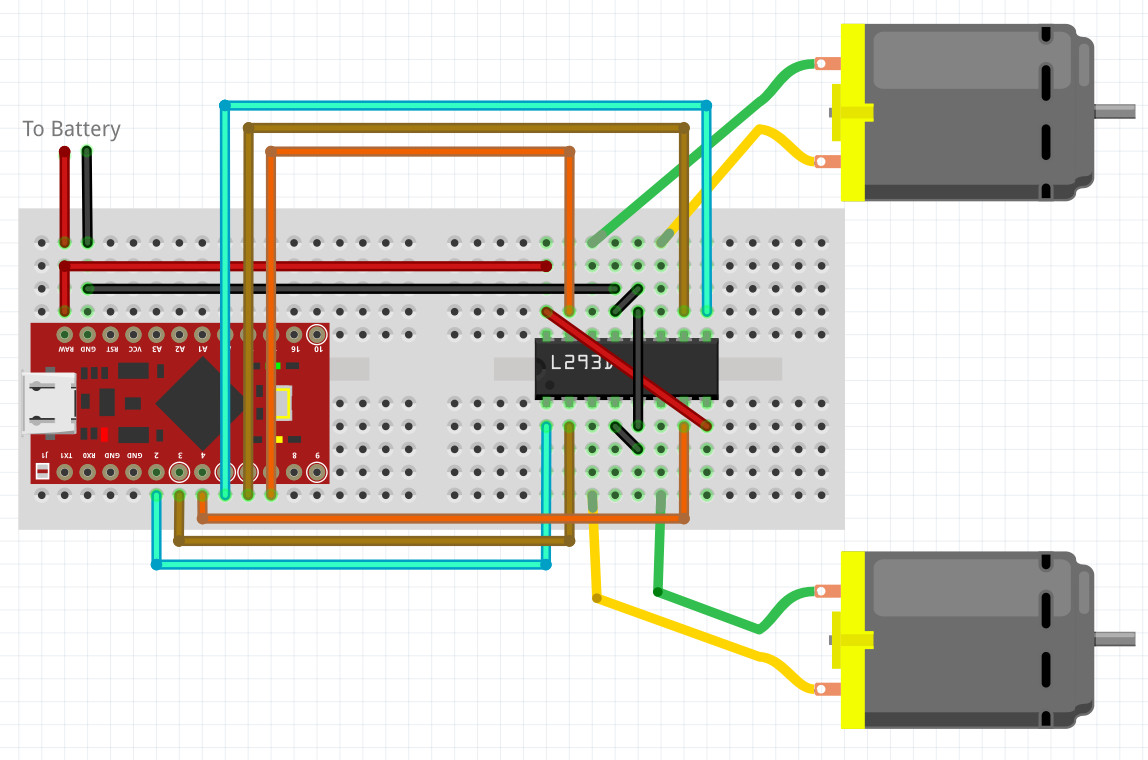
1. Check the motors
Now do the same thing with the motors.
The code below will test the motors by running both forward for one second, backward for one second and then stopped for one second.
Keep in mind that the power from your laptop USB will probably not be enough to power the Arduino and the motors so you'll have to make sure the batteries are in and the switch is on.
                       int lmE = 2;
                       int lm0 = 3;
                       int lm1 = 4;
                       int rmE = 5;
                       int rm0 = 6;
                       int rm1 = 7;

                       void setup() {
                         pinMode(lmE, OUTPUT);
                         pinMode(lm0, OUTPUT);
                         pinMode(lm1, OUTPUT);
                         pinMode(rmE, OUTPUT);
                         pinMode(rm0, OUTPUT);
                         pinMode(rm1, OUTPUT);

                         digitalWrite(lmE, HIGH);
                         digitalWrite(rmE, HIGH);
                       }

                       void loop() {
                         Move(1,1);
                         delay(1000);
                         Move(-1,-1);
                         delay(1000);
                         Move(0,0);
                         delay(1000);
                       }

                       void Move(int left, int right){
                         LeftMotor(left);
                         RightMotor(right);
                       }

                       void RightMotor(int dir) {
                         if (dir == 1) {
                           digitalWrite(rm0, HIGH);
                           digitalWrite(rm1, LOW);
                         } else if (dir == -1){
                           digitalWrite(rm0, LOW);
                           digitalWrite(rm1, HIGH);
                         } else {
                           digitalWrite(rm0, LOW);
                           digitalWrite(rm1, LOW);
                         }
                       }

                       void LeftMotor(int dir) {
                         if (dir == 1) {
                           digitalWrite(lm0, HIGH);
                           digitalWrite(lm1, LOW);
                         } else if (dir == -1){
                           digitalWrite(lm0, LOW);
                           digitalWrite(lm1, HIGH);
                         } else {
                           digitalWrite(lm0, LOW);
                           digitalWrite(lm1, LOW);
                         }
                       }
If there are any issues you can find the proper wiring diagram below.
Write the AI
Combine the two sets of code above to make one file and we'll have all the code we need. Like this
The AI is fairly simple, we want Robby to keep going forward unless he sees an obstacle.
If the obstacle is on his left he should turn right, if it is on his right he should turn left.
Lets make some pseudocode to make it easier to understand.
	                   if there is something on the left
	                     turn right
	                   or else if there is something on the right
	                     turn left
	                   in any other case
	                     go straight
To make it easier you'll notice I've added some functions RightMotor(), LeftMotor() and Move(,).
These are to make it easier, instead of writing two digitalWrite() instructions you can just write RightMotor(1) to make the right motor go forward, RightMotor(-1) to go backwards and RightMotor(0) to stop the right Motor. The same for the left.
Because I am so nice I even made a third function that lets you control both motors at the same time. Move(left, right) passes the numbers directly to the Left and RightMotor functions. eg Move(1,1) makes both motors go forwards, Move(-1,-1) makes both go back, Move(-1, 1) makes the Left Motor go backwards and the Right go forwards, thats a left turn!
With that and a few if statements we can translate the pseudocode above to real code easily.
This should go in our loop() after distL and distR have been updated.
	                   if (distL < 20){
	                     Move(1, -1);
	                   } else if (distR < 20){
	                     Move(-1, 1);
	                   } else {
	                     Move(1, 1);
	                   }