Goal
Today we are going to give Robby some way to defend himself.
1. Servos
To trigger the gun we are going to use a little 9g servo, it's like a motor but rather than just spinning one way or the other we can precisely set the angle of the shaft.
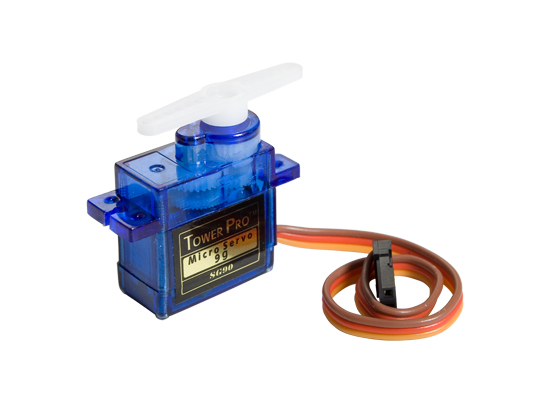
They are fairly simple to control with and Arduino, they have a brown wire which we connect to GND, a red wire which connects to our 5V or Vcc and a yellow wire which we plug into one of our numbered digital pins.
Lets connect one to pin 9 on our Arduino and test it out with the following code.
                    #include <Servo.h> //This library makes managing servos a lot easier and is included in the Arduino software

                     Servo s; // This variable stores our servo object

                     void setup(){
                        s.attach(9); // This does all the setup required and binds our servo to pin 9
                     }

                     void loop(){
                        s.write(0); // Set the servo to an angle of 0 (minimum for this servo)
                        delay(1000);
                        s.write(180); // Set the servo to an angle of 180 (maximum for this servo)
                        delay(1000);
                     }
2. Using the servo to control the gun
Set the servo angle to 110 by using the single line "s.write(110);" in the loop() function, aside from that keep the code as it was in the previous step.
Firmly but gently press the small gear onto the servo shaft, make sure to keep it straight and don't rotate the shaft manually. When fully attached there should still be a small gap of 0.5mm-1mm between the base of the gear and the servo.
Carefully work the servo into the gun so the gear meshes with the trigger gear, screw the two mounting screws in until they are in fully and the servo doesn't wobble. Make sure not to tighten them too much or else the screw hole will be drilled out.
The following code has two defined numbers for the two positions the trigger will be pushed to, when in the FIRE position the spindle is locked and cannot move, a rubber band is fired when our FireGun() function pushes the trigger to the COCKED position and then back to the FIRE position.
Load the gun and upload the following code.
                    #include <Servo.h>

                     #define COCKED 80
                     #define FIRE 150

                     Servo s;

                     void setup(){
                        s.attach(9);
                        s.write(FIRE); // This makes sure the gun starts in the locked FIRE position
                     }

                     void loop(){
                        delay(4000); // Wait 4 seconds between firing
                        FireGun());
                     }

                     void FireGun(){
                        s.write(COCKED);
                        delay(500); // This and the other delay make sure the servo has time to reach its position
                        s.write(FIRE);
                        delay(500);
                     }
NOTE: When there is a signal to the servo it will hold its position, do not try and move the gear manually or else risk breaking teeth off the gear, unplug the arduino or remove the signal wire from the servo before attempting to reload.
Final Robby the Robot Code.
To connect the gun servo to the existing Robby wiring it is best to wire the red wire to the Vcc on the motor controller and the brown wire to the GND on the motor controller, this is becuase it draws straight from the battery. Servos draw a lot of current and can cause problems when plugged into the Vcc on the Arduino.
Plug the yellow signal wire into pin 9.
Due to a conflict between the NewPing and Servo libraries you will need to download this library which uses an alternate method to control the servos. It is a bit more complicated so we won't be learning it today but you will notice that Robbys final code handles servos a little different to what we learned today.
Here is the final code for Robby, he is programmed to fire when the "C" button on the remote control is pressed.
You will also notice a new variable called "debugMode", when this is set to 0 Robby will perform normally, when set to 1 and uploaded he will test his motors by running them backwards then forwards.
Set it to 2 and turn on your Serial Monitor after uploading to test the eyes are workign properly.
Finally you can set it to 3 and turn on the Serial Monitor to test the IR reciever or get codes for new buttons or remotes.